After knowing all the basic things to start blogging, we'll now be walking through the step by step guide on how to create a free blog using Google Blogger platform. I already told you in the first part of this tutorial that this blog is also being managed under Google Blogger platform.
Google Blogger
Blogger.com is owned and managed by Google. A blog created using Blogger platform will be hosted on Google server using a free subdomain – yourwebsitename.blogspot.com. User may wish to buy a custom domain (hosted on another web server or keep using the Google free web hosting) and then connect the custom domain with their Blogspot account. Thanks to Google, all the redirections to your new blog pages will be done easily.To create a Blogger blog, you'll be needing a Google account. You can view our article on how to create a Google account and use across all Google services. Once that is done, you can now follow these step by step procedures:
- Choose your blog name.
- Create a blogger account.
- Choose a template for your blog.
- Publish a post.
- Start sharing.
Choosing Your Blog Name
Before choosing a name for your blog, you need to first consider the following qualities of a blog name.1. Eye-catching
- Choose a blog name that your targeted audience will like such that when they look at it for the first time, they'll want to take a second look.
- User may visit your blog from any other websites and may not be able to recollect the website's address when trying to visit your blog again. So, it'll be better to choose a name that can be easily remembered.
- Your blog name should be moderately short, don't make it too long. It may be scary when it's too long.
- Your blog niche is what your blog is all about. It may be technology, lifestyle, food, travel e.t.c. Once you have your blog niche, it's advisable that you choose a name that is somehow similar or related to your blog niche.
- Buy a custom domain name for your blog and removed the Google blogspot.com domain to shorten your blog address so users can type more faster when entering your blog address in their browser's Url box and you can also enjoy some other important benefits.
Don't Miss!: How To Buy And Setup A Custom Domain Name With Blogger's Blog.
So, choose your blog name based on the above qualities and you are good to go.
Creating Your Blogger Account
Once you have your blog name at hand, you can now create your Blogger account using your Google account email address. I hope you already have a Google email address, if you don't, you can check out our article on how to easily create a free Google account. Once that is done,- Go to blogger.com from your browser and click Create Your Blog.
- Enter your email address and password to sign in to Google Blogger.
- Confirm your Blogger profile with your name that you want to be visible to your visitors and click Continue To Blogger.
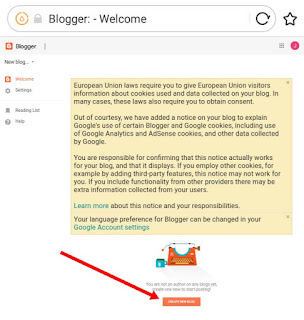
- At the welcome page, click Create New Blog.
- On the pop up window, enter your blog name and your blog address with the sub domain blogspot.com. Blogger automatically check, as you type, if the entered blog address is available.
- Select a theme for your new blog and click Create Blog. You can change your blog theme later by going to Blogger >> Theme and then select any of the free Blogger templates you would like to use.
Publishing Your First Post
Now your blog set-up is complete. It's high time to start unleashing your writing skill. So, go ahead and publish your first post.- Click New Post from the Blogger posts' page.
- Enter the title of your post in the post title bar.
- Enter the content of your post in the post body box.
- Once you are done, select the drop-down Menu at top right corner of the page to open Post Settings. Here, you can enter one or more labels for your post. You can also check out other available options such as changing the permalink, scheduling your post and others.
- Once you are through, click Publish button at the top of the page to publish your first post. There you go!.
Start Sharing Your Post
You can now start promoting your blog by sharing your post to your target audience through social media.- From the Blogger post page, click View from the below post title to see your post in action.
- Scroll down to below post and click the share button.
- Select any of the preferable social media to share your post.
Read Next Article:
How To Start Blogging: Beginner's Guide Part 3 – Some Important Changes You Need To Apply


